Jmeter Recording Steps:
1. Identify the protocol for the application :
First step of any recording should be identification of application protocol. If it is a web based application, it can be HTTP or HTTPs. This can be confirmed from Application Developers.
If the application is HTTP or HTTPS protocol , then Jmeter can be used to record and playback the scenario using the following steps.
2. Launch Jmeter :
When you launch the jmeter application by double clicking the bat file(jmeter.bat or jmeter.sh), By default there will be 2 elements - Test Plan and Work bench.
Test Plan - It is the node where all the recorded scenarios can be saved, add types of listners and transactions can be added.
Work Bench - It is the node in jmeter, which can be used for storing all temporary data. Note: After saving the testplan and the data in work bench is not saved.
3. Add Elements for Recording in Test Plan and Work Bench:
To carry out recording , we must add a Thread group and HTTP proxy Server.
a) Right click on Test plan --> Add-->Thread group

b) Right click on Work Bench --> Add-->Non Test Elements --> HTTP Proxy Server or HTTP Script Recorder

c) In the HTTP proxy server, Change the global settings in Proxy to be 9090. - This is done so that jmeter can listen on the particular port.
d) In the HTTP proxy server, Add Suggest excludes patterns. This is done to exclude unwanted elements to be recorded in Jmeter. The pattern is
“.*\.png” pattern, “.*\.gif” pattern and “.*\.ico” pattern.

4) Setup the proxy changes in the browser :
Open the browser. Change the proxy Settings to be as below. The proxy must be set to the same port as set in HTTP proxy of Jmeter. This is done so that Jmeter can listen to that particular browser.
The port here is set to 9090 in both places and HTTP is given as local host. This setting enables jmeter to listen to that particular browser.

5) Start the Recording :
Now click on start button on HTTP Proxy server, and go the browser and perform the actions that needs to be recorded. The pages or actions clicked will get recorded. If due to some reason, script is not getting recorded, then recheck all the proxy and port settings.

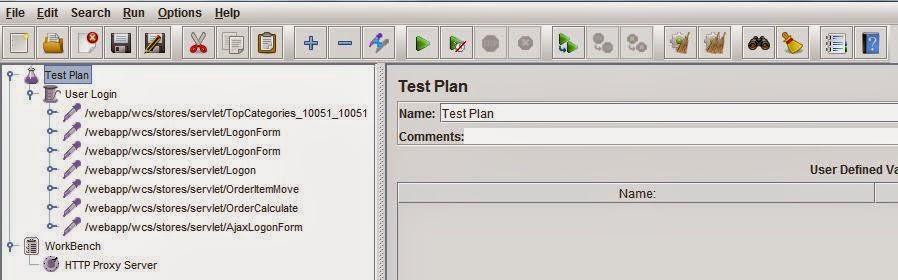
6) Now check the Test plan if some script is getting recorded.
7) Stop and Replay the script
After successful recording, check whether test is getting replayed properly.
This can be done by adding a listener. This will be explained in my next post.
1. Identify the protocol for the application :
First step of any recording should be identification of application protocol. If it is a web based application, it can be HTTP or HTTPs. This can be confirmed from Application Developers.
If the application is HTTP or HTTPS protocol , then Jmeter can be used to record and playback the scenario using the following steps.
2. Launch Jmeter :
When you launch the jmeter application by double clicking the bat file(jmeter.bat or jmeter.sh), By default there will be 2 elements - Test Plan and Work bench.
Test Plan - It is the node where all the recorded scenarios can be saved, add types of listners and transactions can be added.
Work Bench - It is the node in jmeter, which can be used for storing all temporary data. Note: After saving the testplan and the data in work bench is not saved.
3. Add Elements for Recording in Test Plan and Work Bench:
To carry out recording , we must add a Thread group and HTTP proxy Server.
a) Right click on Test plan --> Add-->Thread group
b) Right click on Work Bench --> Add-->Non Test Elements --> HTTP Proxy Server or HTTP Script Recorder
c) In the HTTP proxy server, Change the global settings in Proxy to be 9090. - This is done so that jmeter can listen on the particular port.
d) In the HTTP proxy server, Add Suggest excludes patterns. This is done to exclude unwanted elements to be recorded in Jmeter. The pattern is
“.*\.png” pattern, “.*\.gif” pattern and “.*\.ico” pattern.
4) Setup the proxy changes in the browser :
Open the browser. Change the proxy Settings to be as below. The proxy must be set to the same port as set in HTTP proxy of Jmeter. This is done so that Jmeter can listen to that particular browser.
The port here is set to 9090 in both places and HTTP is given as local host. This setting enables jmeter to listen to that particular browser.
5) Start the Recording :
Now click on start button on HTTP Proxy server, and go the browser and perform the actions that needs to be recorded. The pages or actions clicked will get recorded. If due to some reason, script is not getting recorded, then recheck all the proxy and port settings.
6) Now check the Test plan if some script is getting recorded.
7) Stop and Replay the script
After successful recording, check whether test is getting replayed properly.
This can be done by adding a listener. This will be explained in my next post.
is HTTPS test script recorder and proxy server is same because i don't see option as proxy server?
ReplyDeleteHi Niketa, Yes, In case you are using Jmeter Version 2.11 , Then you will see HTTPs Test Script Recorder..
ReplyDelete